
PingPong Checkout for WooCommerce Installation & Operations Guide
Plugin Version
2.3.6
1. Overview
This guide is intended for operators and integration engineers of WordPress + WooCommerce merchant storefronts. It describes the installation, configuration, integration, launch, and operations of the PingPong Checkout payment plugin (woocommerce-pppay).
| Aspect | Description |
|---|---|
| Target audience | Merchants running their own WooCommerce stores, site builders / agencies |
| Not applicable | Direct API custom integration (refer to the Direct API docs instead) |
| Supported checkout | Classic Checkout only ([woocommerce_checkout] shortcode) |
| Product types | Physical + virtual goods (supports = ['refunds', 'products']) |
Checkout compatibility
WooCommerce 8.3+ defaults to Block-Based Checkout. The current PingPong plugin supports Classic Checkout shortcode mode only; Block-Based Checkout is not supported.
- For new stores, confirm the checkout page uses the
[woocommerce_checkout]shortcode under WooCommerce → Settings → Advanced - Stores already migrated to Block Checkout must restore Classic Checkout before enabling this plugin
2. Installation & Configuration
2.1 Software Versions
| Component | Minimum | Recommended | Notes |
|---|---|---|---|
| WordPress | 5.7 | Latest stable | Plugin header Requires at least |
| WooCommerce | 5.7 | 5.7+ tested | Version check on startup |
| PHP | 7.3 | 7.4 | Enforced on startup |
2.2 PHP Extensions
Missing required extensions will trigger wp_die and block activation.
| Extension | Required | Purpose |
|---|---|---|
| bcmath | ✅ Required | Amount math, avoids floating-point errors |
| curl | ✅ Required | Communication with PingPong gateway |
| json | ✅ | Response parsing (built into PHP 8) |
| hash | ✅ | md5 / sha256 signing (built-in) |
| openssl | Recommended | TLS dependency, usually bundled with curl |
Quick self-check
Run php -m | grep -E 'bcmath|curl|json|hash|openssl' on the server to list loaded extensions.
2.3 System Permissions
| Scope | Requirement | Notes |
|---|---|---|
| WP role | administrator or manage_woocommerce | Activate plugin, configure gateway |
| Filesystem | Web process can read wp-content/plugins/woocommerce-pppay/ | Satisfied by default after extraction |
| Log directory | WP_TEMP_DIR or wp-content/uploads/ writable | Required for error logging |
| Database | Current WP DB user has CREATE TABLE privilege | Two business tables are created on activation |
2.4 Network Connectivity
| Direction | Target | Purpose |
|---|---|---|
| Outbound | https://acquirer-payment.pingpongx.com (production) | Order, query, refund, token requests |
https://sandbox-acquirer-payment.pingpongx.com (sandbox) | ||
| Inbound | /wc-api/notify | PingPong async callbacks, must be publicly reachable |
/wc-api/refund | ||
/wc-api/show |
TLS certificate verification enforced
Starting with v2.3.6, cURL enforces CURLOPT_SSL_VERIFYPEER=true and CURLOPT_SSL_VERIFYHOST=2.
Keep the server CA bundle (/etc/ssl/certs/ or cURL bundled CA) up to date, otherwise order requests will fail certificate verification. Do not disable verification as a workaround.
2.5 Performance Recommendations (avoid 504)
The PingPong acquiring endpoint has a 50-second timeout ceiling. Align your web layer timeouts accordingly:
php.ini:max_execution_time = 60- Nginx:
fastcgi_read_timeout 60s; - Apache:
Timeout 60
2.6 Upload & Activation
Option A: Backend upload (recommended)
- WP admin →
Plugins → Add New → Upload Plugin - Choose
woocommerce-pppay.zip→Install Now - Click
Activateafter installation
Option B: FTP/SFTP extraction
- Extract the zip and upload the
woocommerce-pppay/directory towp-content/plugins/ - WP admin →
Plugins→ activatePingPong-Checkout
On activation, WordPress fires register_activation_hook and creates the business tables automatically (see 2.7 Database Changes).
2.7 Database Changes (automatic)
| Table | Purpose | Key fields |
|---|---|---|
ping_pong_payment_log | First-time transactions | transaction_id (unique), pp_status, query_response, notify_response |
ping_pong_secondary_payment_log | Secondary transactions (refunds, etc.) | transaction_id, merchant_transaction_id (both unique), payment_type, amount |
Data preserved on uninstall
These two tables are not dropped on uninstall; only the woocommerce_pppay_settings option is removed, to support compliance retention. Run DROP TABLE manually if a full cleanup is required.
2.8 Log Directory Configuration
Edit wp-config.php via FTP and append the following after the ABSPATH definition:
/** Absolute path to the WordPress directory. */
if ( !defined('ABSPATH') ) {
    define('ABSPATH', dirname(__FILE__) . '/');
}

define('WP_TEMP_DIR', ABSPATH . 'wp-content/tmp');
Make sure the directory exists and is writable:
mkdir -p wp-content/tmp
chmod 755 wp-content/tmp
chown www-data:www-data wp-content/tmp  # adjust to your web user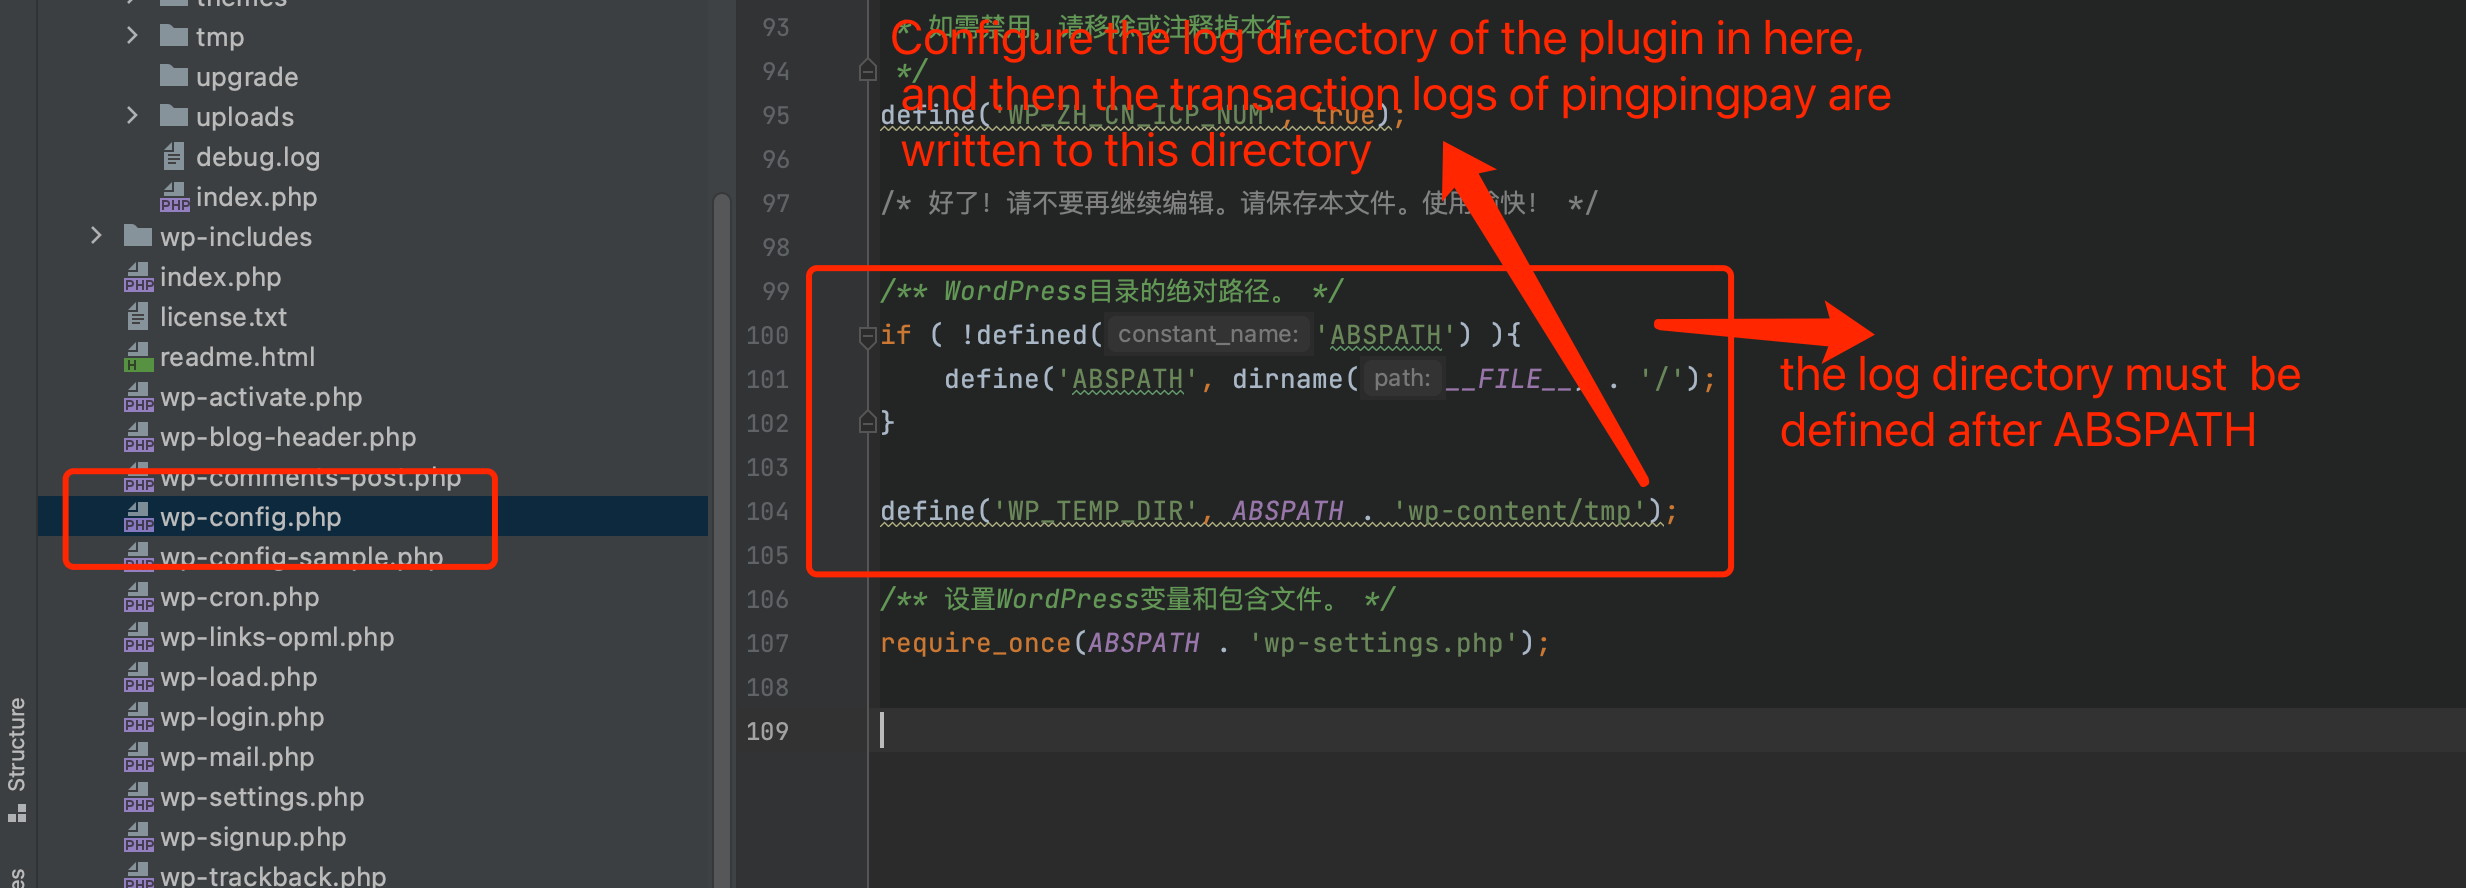
2.9 Payment Gateway Configuration
- WP admin →
WooCommerce → Settings → Payments - Locate
Credit Card (PingPong Checkout)→ toggle it on → clickManage
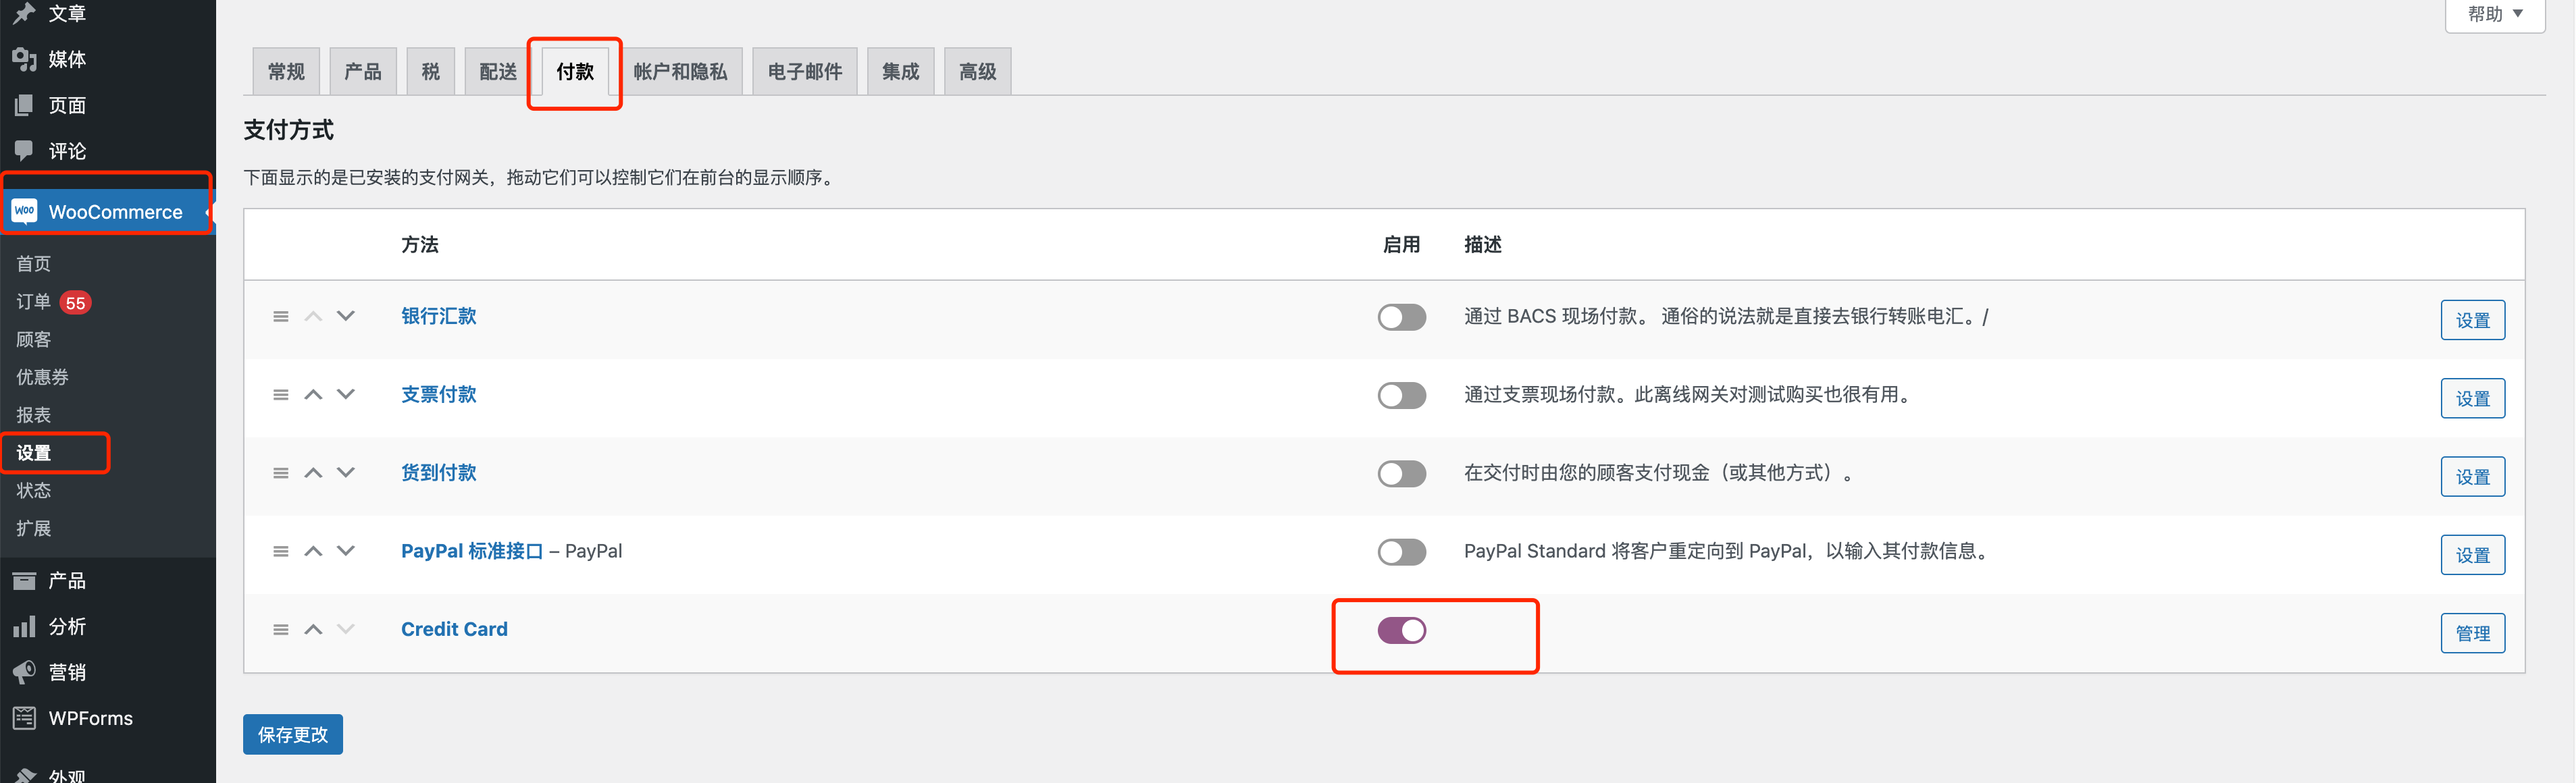
- Fill in the parameters and save:
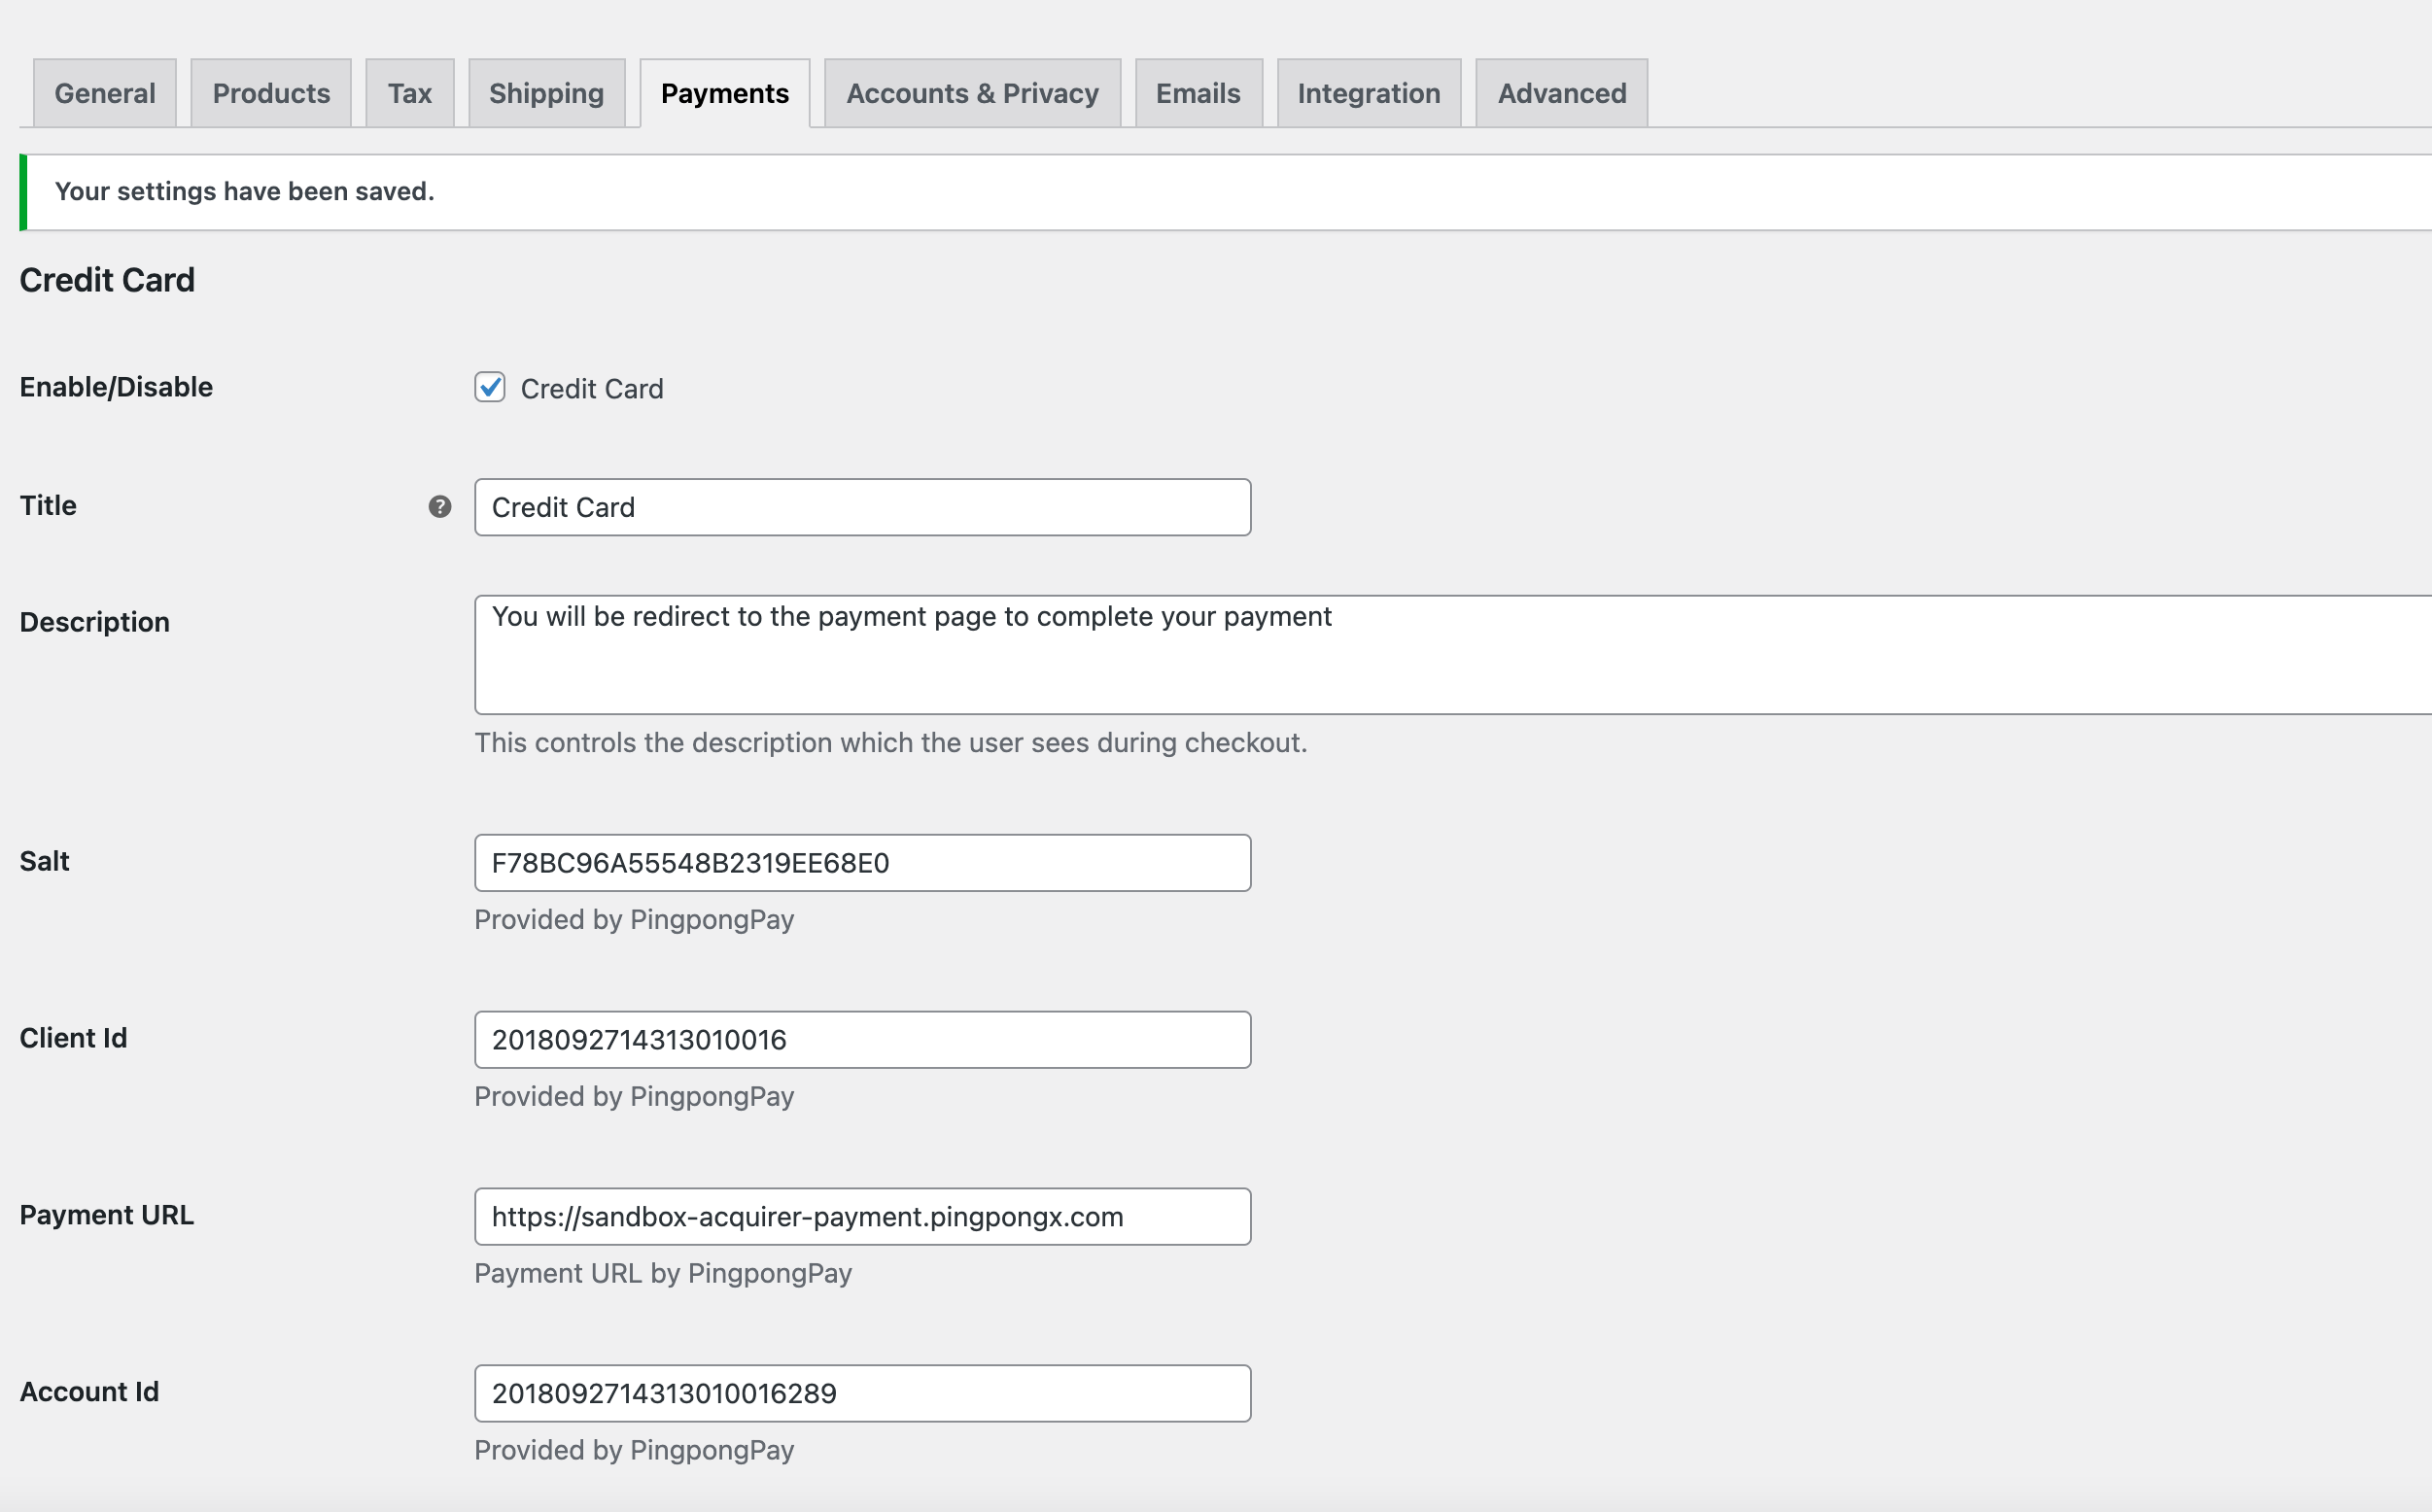
| Field | Sandbox example | Notes |
|---|---|---|
gateway | sandbox / production | Environment switch |
clientId | 2018092714313010016 | Merchant backend → System Management → Key Management |
accId | 2018092714313010016291 | Merchant backend → Group Management → Site Details |
salt | F78BC96A55548B2319EE68E0 | 1:1 with clientId, never disclose |
allowedCountries | ANY / SPECIFIC | Whether to restrict by country |
specificCountries | List of country codes | Only effective when the previous field is SPECIFIC |
3. Integration & Launch Workflow
3.1 Pre-install Checklist
3.2 Plugin Download
The package is approximately 213 KB with 237 files and bundles the
vendor/directory — nocomposer installis required.
3.3 Sandbox Integration
- Complete the installation per Section 2 and configure the sandbox parameters.
# PingPong sandbox store parameters
clientId: 2018092714313010016
accId: 2018092714313010016291
salt: F78BC96A55548B2319EE68E0- Self-test with sandbox test cards:
# Standard test card
Card number: 4200000000000000
Expiry: 12/22
cvv: 123  (cvv must be 3 digits)

# 3DS test card
3DS card: 4711100000000000# Sandbox URL
Sandbox https://sandbox-acquirer-payment.pingpongx.com
# Production URL
Production https://acquirer-payment.pingpongx.com- Capture screenshots:
- Send the screenshots to the integration group and notify technical support.
Sandbox discipline
The sandbox does not actually charge cards, but never ship goods during testing: shipping causes real losses; not shipping invites cardholder complaints. Once integration testing passes, immediately disable the payment channel and only re-enable it after the production launch.
3.4 Production Launch Workflow
Detailed steps:
- After sandbox integration passes, the PingPong business / compliance review begins (site profile + account qualification).
- Once approved, production clientId / accId / salt are issued.
- The merchant replaces parameters with production values in the WP admin.
- The merchant self-tests with one small order (a
$1product link is recommended) and captures screenshots. - Send the screenshots and product link to the integration group — technical support will initiate a real transaction against that link.
- After a successful real transaction, the merchant initiates a refund to verify the refund flow.
- Once the above is complete, the payment channel goes live.
3.5 Obtain accId & Secret Key from the Merchant Backend
After receiving the approval notice from the integration group or business/customer contact, log in to the Merchant Backend.
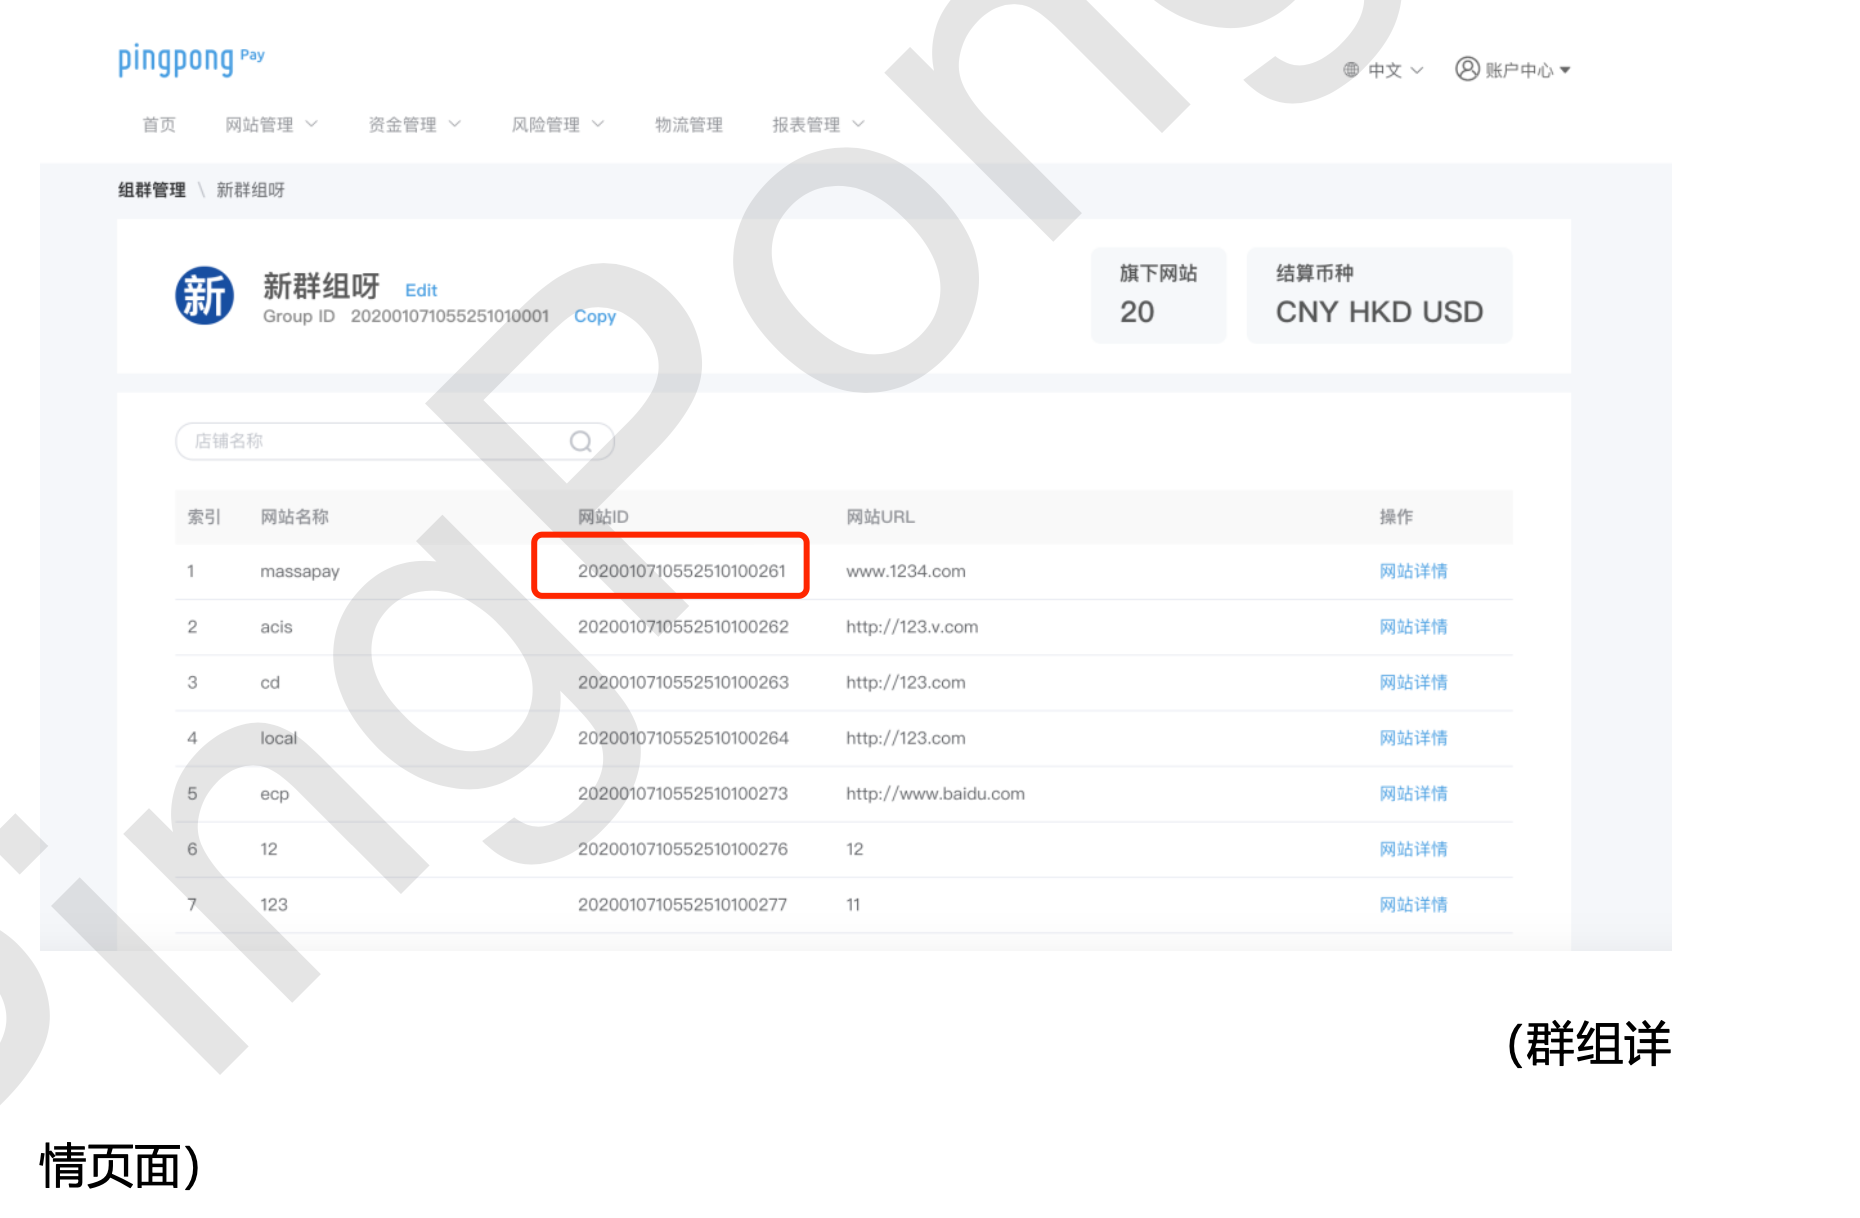
Open the website list
From the menu, choose [Website Management] → [Group Management] → [View Details] → [Website List]
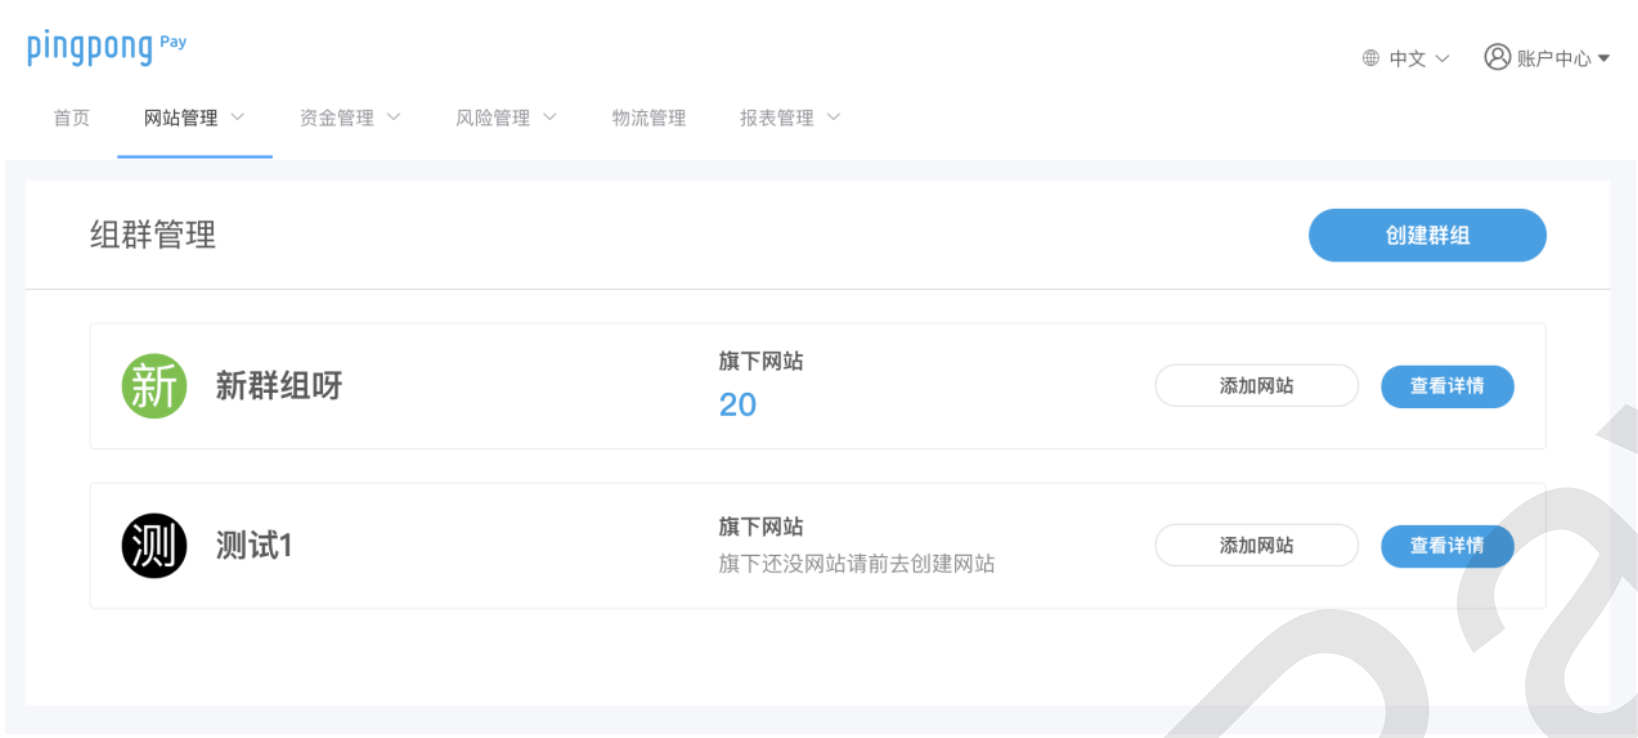
Group management supports the following operations:
- Create group: Click "Create Group" to add a new group; a default group is provided out of the box
- Website membership: Websites are attached to groups; every website must belong to a group
- Detail management: Click "View Details" to rename the group, view/copy the group ID, and list its websites
Select the website
Pick the website matching the domain you are integrating from the list
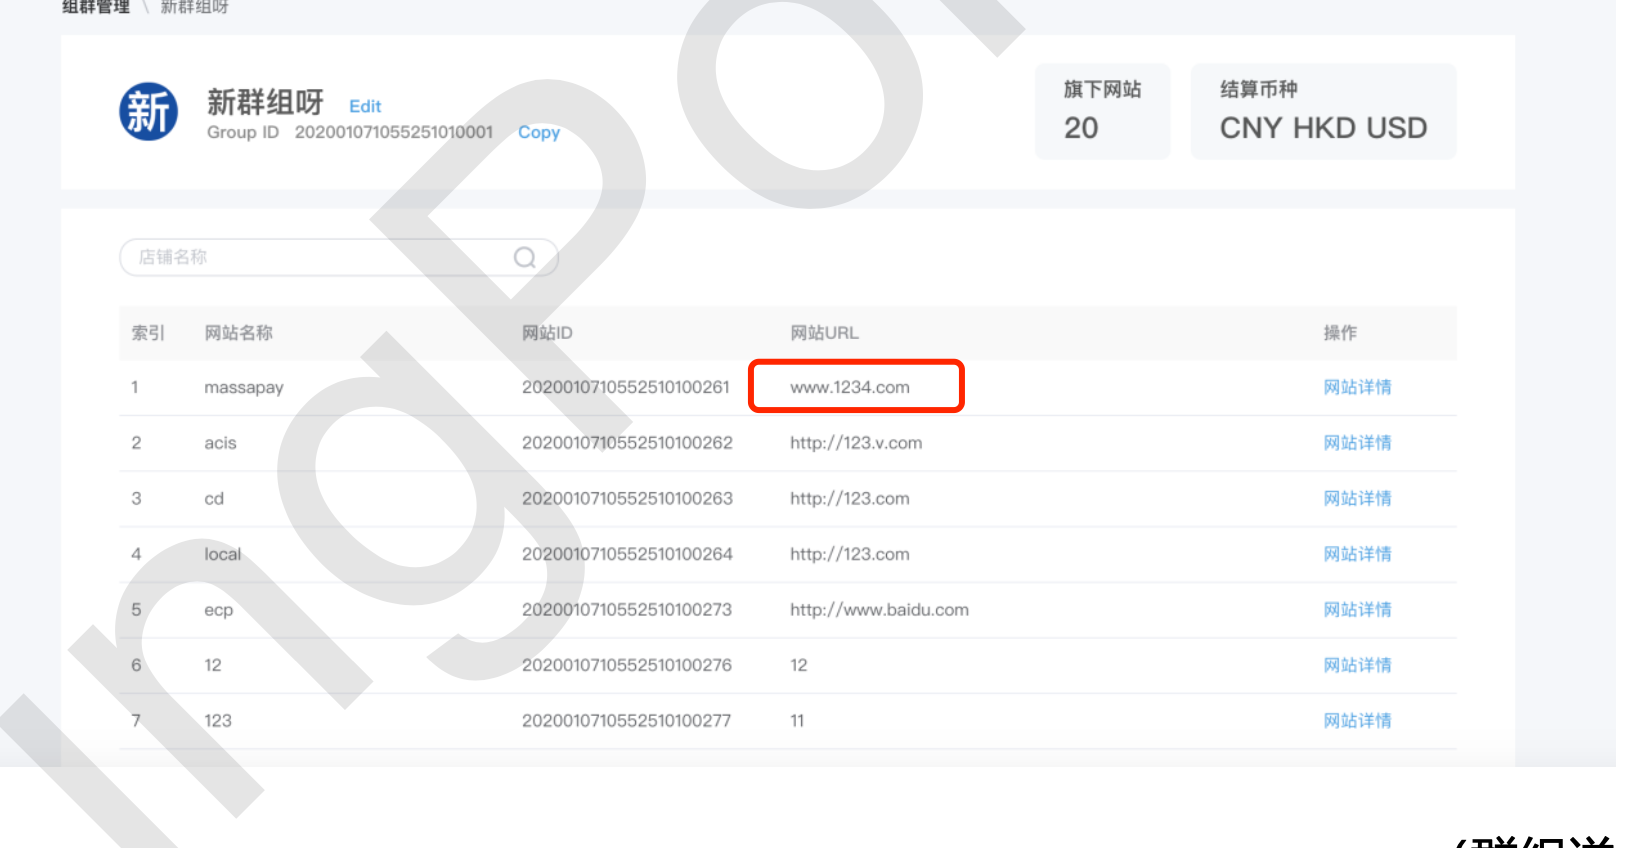
Obtain the accId for the matched domain
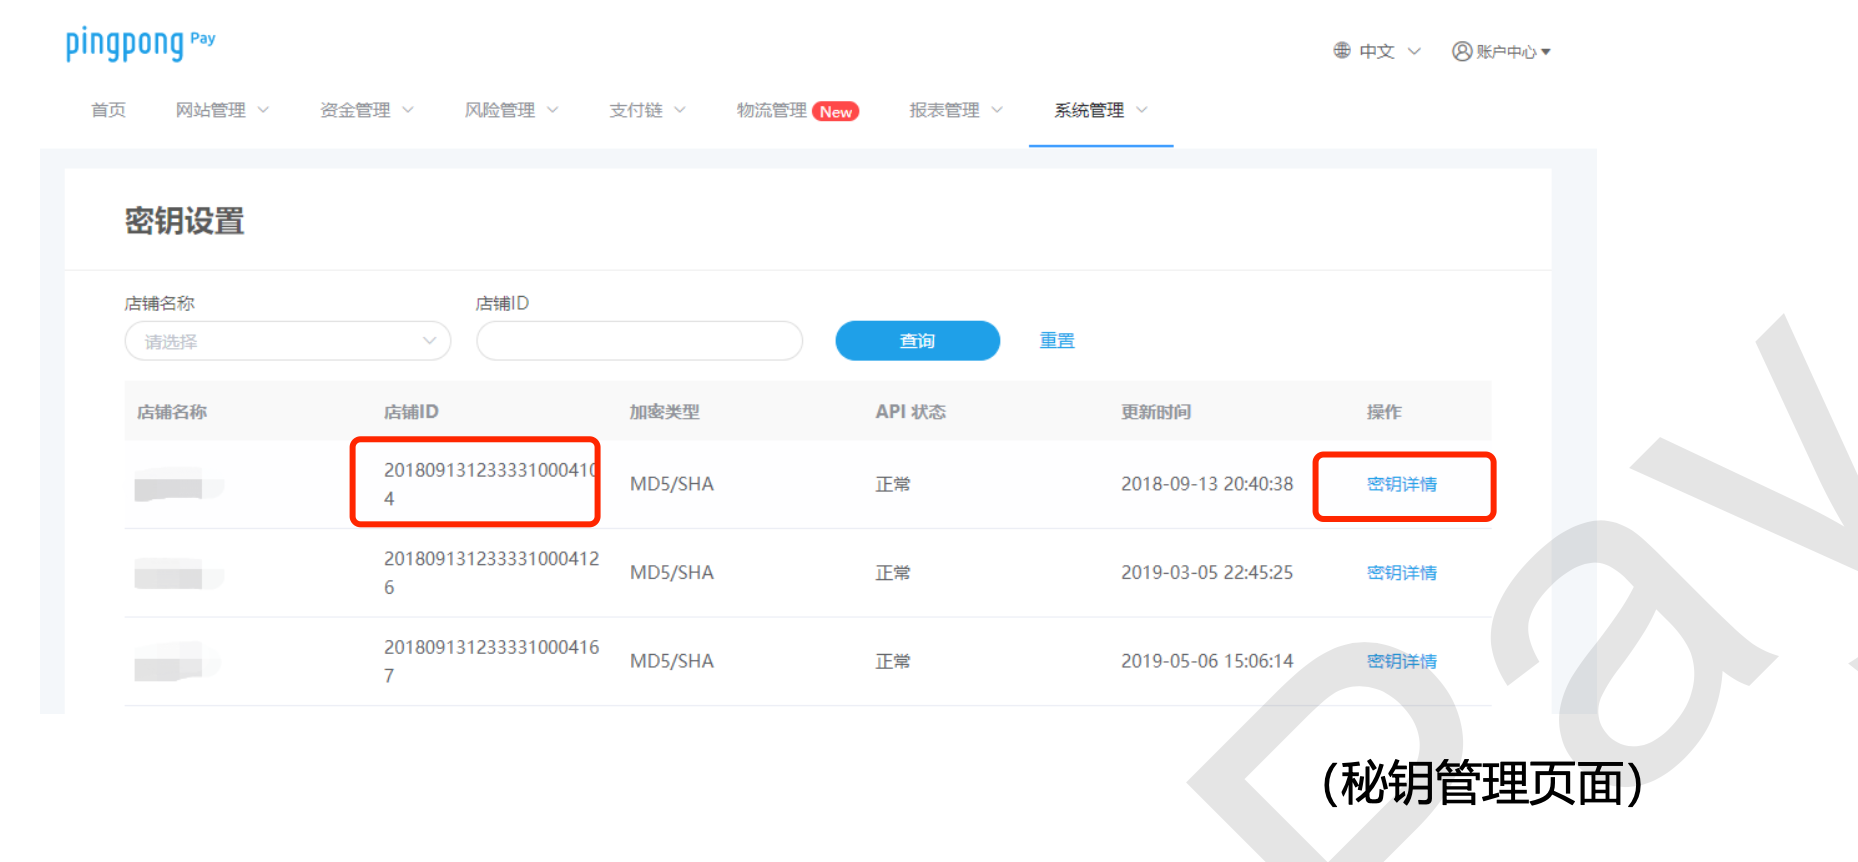
Obtain the secret key
From the menu, choose [System Management] → [Key Management] → click "Key Details" to view the specific key fields.
Key status reference:
- Normal: Usable
- Abnormal: Not usable — contact your business representative to resolve
4. Funds Safety & Risk
4.1 Status Verification & Reconciliation
Status-first principle
In live production operations, always treat the payment status shown in the acquiring merchant backend as the source of truth. Before shipping, log in to the merchant backend and verify the order status.
This plugin does not provide reconciliation. Merchants must download statements from the merchant backend and reconcile them against site orders on a regular basis to ensure order status, amounts, and refund records are consistent.
4.2 Order Number Rules
Order numbers are provided by WooCommerce. They may originate from:
- The default database auto-increment order number
- A "custom order number" plugin installed by the merchant (e.g., Sequential Order Number, Custom Order Numbers, etc.)
Regardless of the source, the merchant must ensure order numbers under the same accId are unique and monotonically increasing.
Funds safety red line
The PingPong backend enforces the following rules — merchants are responsible for complying:
- Order numbers under the same accId must be unique and monotonically increasing, otherwise order status issues will occur.
- Orders from different databases cannot share the same accId (multiple sites cannot share one accId).
- If the accId already has historical transactions, set the starting order number to a value greater than the maximum existing order number before activating the plugin.
- When resetting the database, migrating the store, or moving the accId to another store, first check the maximum order number under that accId.
Violating these rules causes order status mismatch and callback mis-routing, directly impacting reconciliation.
If a "custom order number" plugin is used, verify that the generated order numbers remain unique and monotonically increasing across restarts, migrations, and concurrent requests. Database-sequence-based or strongly-validated solutions are recommended.
4.3 Secret Key Security
The salt is the signing key. Anyone who obtains it can forge legitimate refund requests. Please strictly follow:
- ❌ Never embed
saltin client-side JS / templates - ❌ Never share
saltin console output, logs, screenshots, or chat tools in plain text - ❌ Never export
wp-optionscontainingsaltto third parties - ✅ Only transmit
saltvia the WP admin config field and trusted channels (integration group)
4.4 Network & TLS
- Since v2.3.6, cURL enforces
SSL_VERIFYPEER+SSL_VERIFYHOST=2 - The server must maintain a valid CA bundle
- If the order API returns an SSL error, first check whether the CA bundle is expired — do not disable verification
- The inbound callback path
/wc-api/notifymust be publicly reachable; in WAF / Nginx, restrict ingress to PingPong egress IP ranges only
4.5 Refunds & Secondary Transactions
- The plugin's
process_refundonly validates that the amount is positive — it does not block over-refunds. Verify the amount before issuing a refund. - Partial refunds are recorded in
ping_pong_secondary_payment_log. When the status entersPROCESSING, the order status is frozen until the PingPong backend writes back the final result. - Both the refund reference
merchant_transaction_idand the originaltransaction_idhave unique constraints — duplicate submissions are rejected by the database.
4.6 Uninstall Behavior
Uninstallonly deletes thewoocommerce_pppay_settingsoption- The two business tables are preserved for compliance traceability; run
DROP TABLEmanually if a full cleanup is required
5. Troubleshooting
| Symptom | What to check |
|---|---|
| White screen after activation | PHP < 7.3 or missing bcmath / curl; check the admin notice |
| Order API returns SSL error | Check server CA bundle expiration; do not disable verification |
| Order API returns 504 | See 2.5 Performance; align PHP / Nginx / Apache timeouts |
| Payment succeeded but order status not updated | Verify /wc-api/notify is publicly reachable and not blocked by WAF |
| Refund fails with "duplicate" | merchant_transaction_id already exists; generate a new refund reference |
| Historical order conflict under the same accId | See 4.2 Order Number Rules; adjust the starting order number via the merchant backend or database |
6. Appendix
6.1 Key Registered Hooks
| Hook | Type | Purpose |
|---|---|---|
plugins_loaded (0) | action | Load entrypoint, environment check, register gateway |
woocommerce_payment_gateways | filter | Register WC_Pppay |
woocommerce_api_{notify/refund/show} | action | Async callback endpoints |
woocommerce_thankyou_pppay | action | Payment completion page |
wc_ajax_ppc_token_request | action | Frontend token exchange |
wc_ajax_ppc_polling_order_status | action | Order status polling |
wc_ajax_ppc_get_order_detail | action | Fetch order detail |
add_meta_boxes | action | Admin order MetaBox |
register_activation_hook | hook | Create tables |
register_uninstall_hook | hook | Clean up config |
6.2 Version Information
| Item | Value |
|---|---|
| Current plugin version | 2.3.6 |
| Package | woocommerce-pppay.zip (~213 KB, 237 files) |
| Dependencies | vendor/ is bundled; no composer install required |